
Steam is by far the most popular platform where users can buy games and play them with their friends. However, most of these games are big, which means that any time you buy and download a game, you’ll need to wait for a good while for it to download, even with a fast internet connection. It’s pretty much the same issue for users who have a massive Steam library, and want to move it to another PC. Let us see how to move Steam games to another drive without redownloading.
Whether you’ve bought a new PC, or just want your games to be available on all your computers at home, there is a way to transfer Steam games to another PC. There’s actually more than one, so let’s take a look at them.
Move Steam Games to Another Drive
Step 1: Relocating Steam files
The first and the simplest one by far is to copy the games using an external hard drive or a large enough flash drive. Note that this may take some time, depending on what medium you’re using to copy the files from your original PC to the other one.
Your Steam files are all found in the C: drive, under Program Files, and then Steam, by default. Unless you’ve chosen another place to store your Steam files and games, this is where you’ll find them. The game files themselves are found in the SteamApps folder, but you’ll also need the Userdata folder, too.
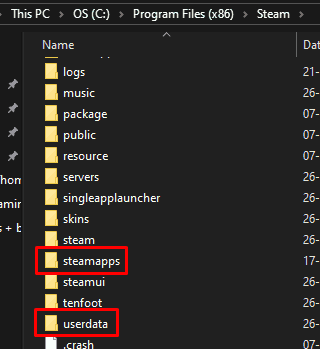
1. Select these two folders, and copy them to your external media.
2. While the files are copying, you can install Steam on your other PC. Don’t use your username and password to log on, we’ll do this later. When the files are done copying, connect your external media to your other PC.
3. At this point, you’ll want to copy over the files from your external drive, to your other PC’s Steam folder. Unless you’ve changed it, it should be at the default location – C:\Program Files\Steam.
4. Paste the files there, and if Windows asks you to merge the existing files and folders, do so. This will also take a while, so let the copying procedure finish.
5. Once everything is done, log on with your Steam username and password. Since most of the files for your games are already there, the only thing that you’ll need to wait is for Steam to do some minor updates. This shouldn’t take long, and you’ll have your games up and running!

What to do if you encounter an error?
Now, if this doesn’t work, there are two more things to try.
One of them is to manually start the game you just copied, via the .exe file. This won’t directly launch the game. Instead, it will open the Steam app, ask you to log in, and then update itself with any files you may have missed during moving. Afterward, you’ll be able to play the game and it will be in your Steam library on your other PC.
The other thing is to trick Steam into installing it again. If, when you log on, your old games aren’t there, try searching for them in the Steam marketplace. The installation has a “Discovering existing files for …” stage, where it searches for any existing files in order not to download them again. When this happens, it will find the files you have copied, and run the game.
Oh, and one last thing here. The save game files for your games are kept in your Documents folder, so make sure you copy that as well if you want to continue playing where you left off. This also applies for configuration files, custom content multiplayer games use, skins, textures and custom maps.
If you have a problem backing up the files, you can use pc transfer software like easeus.
Step 2: Backing up game files
Truth be told, the method above is more of a workaround. It is officially supported by Steam, but there are some games that simply refuse to work, and this is more of the developers’ fault, instead of Steam. Steam’s Backup feature will compress all of your files for the game, or games, and let you copy them to another PC via an external drive.
1. When you start Steam on your initial PC, head to your Library section. Find the game you want to move, and right-click its name.
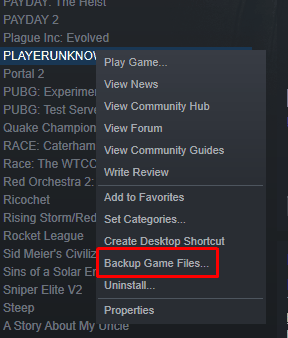
2. Choose “Backup game files…”, this is where you’ll be able to choose any other games you’d like to back up. Make sure you have plenty of room on your external drive for all the games you’re copying.
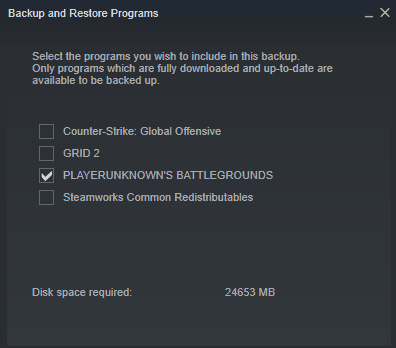
3. Choose “Next”, and browse to the folder where you want your backup files to be created. By default, this is C:\\Program Files\Steam\Backups, but you can easily change it to something better.
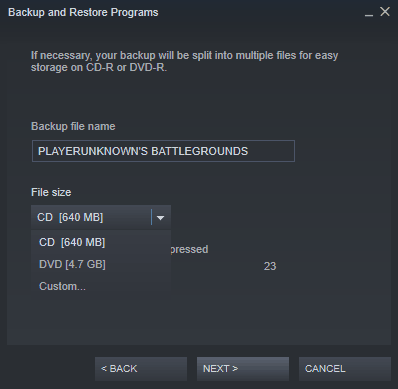
4. Click “Next” again, and select the file name.

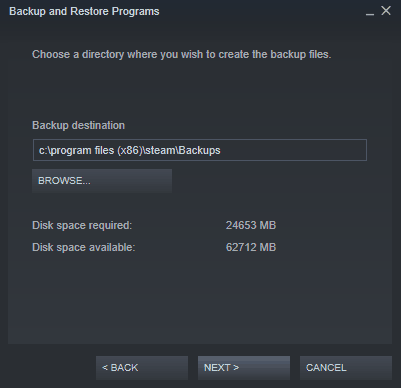
5. You’ll also need to choose the File size for the external media you’ll be using.
6. Click ”Next” one last time, and the backup process begins. Give it some time – the more games you have, the longer it will take. Once it’s done, it will give you the option to open the backup folder, where all the files are. This is what you’ll want to copy to your external media, so go and grab it.
7. Once you’re done copying the files, move them to your other PC. You don’t have to put them in the Steam folder, but make sure you know where they are.
8. Launch Steam on the other PC, and log on with your account.
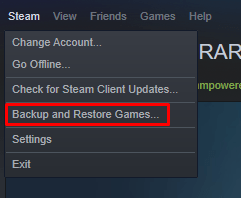
9. Once you’re logged in, click on Steam, in the upper left corner. You should see a button that says “Backup and restore games”, click it.

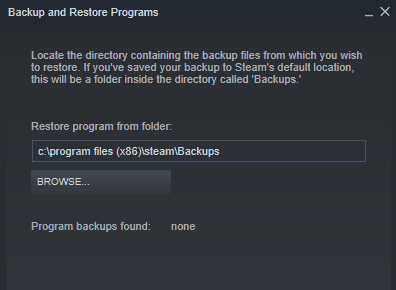
10. Choose “Restore a previous backup”, and browse to where you copied the files for your games earlier.
11. Follow the instructions of the restore wizard, and you should have your games moved to another PC in no time.
One thing to note here as well. There are plenty of games that resort to third-party installers or downloaders, and these may not work with the backup feature. Only games that you download, install and update completely via Steam are compatible with this method, so use it with a grain of salt. Also, the backups that you create don’t include your saved games, as well as any custom configuration files or custom multiplayer maps. If you want to back these up too, follow the steps below.
- Head to your Steam directory.
- Under SteamApps, open the “common” folder, and the folder of the game whose files you’re trying to copy.
- Copy the files within the folders below, to an external media:
- /cfg/ contains all of your configuration files
- /downloads/ contains any additional custom content that multiplayer games may use
- /maps/ has any downloaded maps, such as ones used by multiplayer games
- /materials/ is where you’ll find your skins, as well as textures
- /SAVE/ is maybe the most important folder – it contains all of your saved games for your single player games
- Paste the files you copied to their corresponding folders on your new PC – this should give you all of your saved files and other game assets back.
Wrapping things up
Even though at one point moving your games to a new PC was a difficult task, it is now much simpler thanks to the two methods mentioned above. We hope to have helped, and you can now enjoy your games on another PC!

